Why Can't I Fly There... Without a Waiver

Vagabond Photography(VB): It’s great day, we at Vagabond Photography now offer UAV(Drone) services to our clients and we can fly anywhere we please. Today we’re going to fly the port of Milwaukee.

FAA Rep: Not so fast Mister.

VB: why?????

FAA: because where your client would like you to fly for their assignment in located inside a restricted flight area. You’ll have to apply for a waiver.

The above is true for a Part 107 pilots, as certified pilots we cannot just fly anywhere we or a client would want us too. In much of the Greater Milwaukee area we have to work around controlled airspace via General Mitchel Airport(class C), Timmerman Airport(class D) and Waukesha Co Airport(Class D with a Class E extension) (see map 1).  To fly in those areas, we would need to obtain a FAA waiver under part 107.41 requesting airspace authorization.

Restricted flight map of Milwaukee

Restricted flight map of Milwaukee

Say a client was to approach us and says we would like you to photograph our new building project on Jones Island and can you do this in the next 20 days? First, let’s refer to the map the little red dot in the shaded purple circle represents where said client would like us to fly. This helps us answer our clients question a little, the right off the bat answer is no not currently. To fly in that shaded area we must apply for a waiver from the FAA. Then provided the FAA gives us permission the answer is yes but it sill could exceed the 20 days the client had requested and take as long as 90 days for a yes, no answer. Also the waiver is time sensitive which mean the pilot in control has to fly at the time requested on the waiver or on the backup date during the approved time.

You may ask what does a waiver do for us and why does the FFA require us to obtain one? For the proposed Jones Island assignment there are a few answers. 1. Provided we are granted a waiver, it allows the FAA and air traffic control to notify incoming and outgoing air traffic there is an unmanned aircraft working the vicinity of the airport to the Northwest. If you refer to map 1 again, you will notice that the proposed location is adjacent to the inbound flight line for runway 19R(marked in gray). 2. In the waiver we must explain to the FAA how we plan to ensure safety going above and beyond what part 107 requires. This can be done by adding additional spotters to notify the done pilot of incoming aircraft or by making the drone more visible to oncoming traffic and explain that we do not place to fly outside of a certain radius keeping us away from inbound traffic. Also, that we are not a distraction to other pilots.  3. It saves the pilot and customer from a fine from the FAA if caught flying without a waiver. Through some research the fines that have been given out range between $400 to $18.700 with one outlier being levied at $1.9 million (story here) and also for the pilot it can also mean revocation of his/hers certificate.

We've obtained a waiver now what? Great the FAA decided to grant us a waiver and now we can fly, though there are going to be some stipulations on the when and possibly from how long. Also make sure you have planned for a secondary date encase of inclement weather.

I understand the a potential client this may seem like a lot of work just to go though to fly around and photograph/video a building or a job site. Though, it is something unmanned pilots and I know is necessary, for safe flight operations for those on the grounds and flying in the sky and at the end of the day you’ll be happy you have an unmanned pilot that took the time to do it right.    

Lume Cube Review

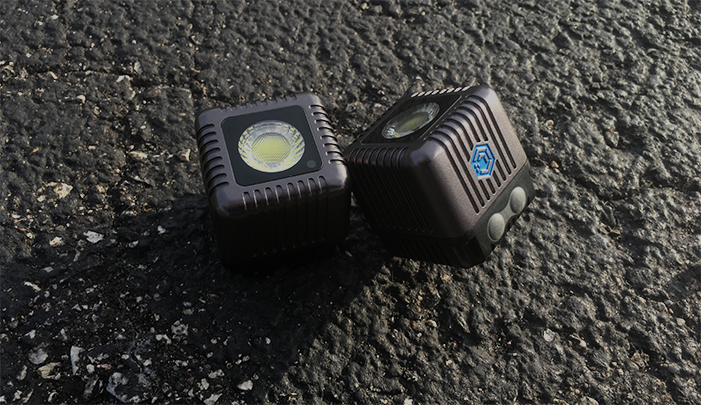
Back in December of 2016 I bought a set of Lume Cubes and I wanted to give them a good run though before writing a review for their product. For those of you not familiar with Lume Cube they are a small yet fiercely powerful light and can be used in a variety of settings and activities.

The light dimension is about a 1.5” cube to give you an idea of its size, it comes in blue, black and sliver/gray casings. Lume Cube has made some special give away cubes that were red and other colors but I have not seen those for sale (cause I would love a red one). The light color is around 6000K so it does have a light blue tint to it and it is extremely bright.

The light itself is really simple to use it has two push buttons on top one to operate the light. With the back of the light facing towards you the left button operates the light on its own. Once it is turned on you can tap the button repeatedly and increase the power of the light in 10% increments. the right button is activates the Bluetooth function of the light which allows it to pare with your phone or tablet.  From there you can modify the light in single percent increments.

The App for the Lume Cube has recently been up dated and for the most part is still the same. You can pair up to five Lume Cubes at one time and active them all with the touch of the screen. The one thing I like about the app is that it remembers the intensity percentage of the light when you turn it on and off the lights or the App. The one down side I did notice in the App is when you do modify the light brightness on the App the results are not immediately visible it does require you to turn the light on and off again with the little light power button on the app. The distance the light works with is the App is based on the power of its Bluetooth and your mobile device. I use a Samsung Galaxy Note 10.1 tablet and Motorola X Pure phone and the distance from where it works to where it doesn’t is about 40 feet for my devices. So results may vary depending on your mobile device.

When the light is on full power it will last about 20 to 30 minutes depending on surrounding conditions. Lume Cube says on full power expect about a 22-minute run time. So what I have experienced is within stated running timeWith the light below 75% power one can expect anywhere between a 45 minute to an hour and a half run time. The light does tend to get a bit warm with time especially on full power, not by any means that this is a down side but it is something to be aware of.

The one thing I love about this little light is that it is water resistant/proof up to 100 feet. I live on a lake with a max depth of 40 feet and this winter while the ice was on the lake I did pare both lights up with my Contour Camera. They work quite well in low level light and a depth of around 35 feet.

As for charging there is a screw off cap on the back of the Lume Cube to access the charging port. The cap has a rubber O-ring on it so it keeps the water out when screwed on tight. It can be easily removed for charging with a quarter or a nickel. The charging port is a USB type C connection and it will charge the Lume Cube in about an hour and a quarter to an hour and a half from being completely dead. Even if the Lume Cube is not being used for long periods of time the battery will still slowly drain, so the night before you use it to put it on the charger for a while just to make sure you are prepaired.

Some of the other uses I have found for Lume Cube is working on my vehicles because of their small size it has allowed me to get light into a small area where you can’t normally fit a normal flash light.  It also works well in flagging a passing by snowmobile with the pulse setting on the app when you are broken down on the side of the trail.

Lume Cube also offers a multitude of accessories for their lights. I am looking forward to getting the light house case and along with the honey comb pack and defuser bundle when they are released. By the looks and current online information, they will be held to the case by magnets so it will be interesting to see how they hold up with jarring and shaking. You can currently also get mounting accessories kits for the DJI Phantom series, Inspire series, also for the Yuneec Typhoon H and the Autel Robotics X-Star Drones.

The Lume Cube light is a small light that packs a big punch and is extremely versatile and it worth the $79.99 price tag. So if you are in the market for a small compact light it is worth the purchase and addition to your lighting arsenal.